Crafts

How to Make Your Own Mickey Ears – Diy Mickey Ears

Have you ever needed the perfect mouse ears for a dining event or to match your outfit? What about the perfect ears to meet a certain character, but they just were not available to purchase at the parks? This is when combining your love of Disney with a bit of crafting comes into play! When you make your own mickey ears, the possibilities are endless! But just how do you make that happen?

One of our Dream Designers, Cat, joins us today to walk us through the process of creating the perfect mouse ears for your upcoming vacation or just to add a little magic to your daily life.

What You’ll Need:

  • Glue gun and glue sticks
  • Fabric scissors
  • Xacto Knife
  • Sharpie Pen/Marker/Fabric Pencil
  • Headband
  • Fluffy Ear filler x 4
  • Bow Stiffener (optional)
  • Fabric for Ears
  • Fabric for Bow or pre-made bow
  • Trim (optional)
  • Safe cutting surface
  • Pattern pieces

Gather Your Materials and Choose Your Design

Lay out all of your pieces, and decide the design of your ears.  You can create very simple ears, or very complex ones!  I recommend starting with a simple pattern, then getting more complicated as you perfect your design.  When it comes to fabric choices, I have found that fabrics with a little stretch in them are easier to pull over the rounded ear edges smoother.  For the bow, most anything can be used, with or without stretch.

Prepare and Stiffen the Bow Fabric

Let’s start with the bow.  I like to use a piece of felt or something similar to help stiffen the bow so it sits nicer.  This is optional, but may be needed based on your bow fabric choice.  I am using a slinky satin like polyester for this project, and the stiffener really helps it hold its shape.  You want something soft, but with some substance.  The bow fabric I’m using is about 6” by 16” and the stiffener is bout 7” by 5”.  You can fiddle with these measurements based on the size bow you like.  You also need a piece of bow fabric that is about 2.5” by 5” for the middle wrap to give it that finished look.

NOTE:
*Throughout the entire ear making process, glue is very important, but too much will make your finished project look very messy. So take your time, don’t burn yourself, and remember you can always add more. Also keep kids and pets safety in mind with hot glue guns and cords out! *

Assemble and Decorate the Bow

Fold the bow fabric around the stiffener, to make a rectangle. Be careful that all raw edges are tucked in, and be mindful of where you place seams, as they will affect how the bow bends. Tack these down with just a touch of hot glue.

Tack the fabric down until you have a finished rectangle. I like to cheat my folds in just a bit, to keep a cleaner line from the front view.

Once that rectangle is all wrapped up like a little gift, set it aside. For the middle wrapper piece, you want to lay it down and fold the long sides in, again covering those raw edges, and then tack it down so you have a little tube.

Play with the rectangle and fold it accordion style into the shape you like. I prefer that the top and bottom fold be turned away from me, but it takes come playing with to shape the bow just right!

Once you have it in your fingers how you like it, you can slide a teeny dab of glue between the folds of the bow on the front and back. Don’t press them too hard or you’ll get an odd shape to your center. And if you put in too much glue, it gets thick which can also alter the desired look. Center the wrapper over the bow and tack it to the front of the bow over the folds. Then wrap it around to the back and fold in the top of the wrapper, then the bottom, tucking in those loose edges. Cut off any excess wrapper to keep it from getting to thick. While the glue is drying you can tug on and fuss with the bow. Then set it aside.

Create the Disney Ear Template and Cut Out the Components

Time for ears! Here is a mickey ears template to use. There are a lot of patterns online for the foam and fabric pieces. I found this one works best, and then printed it at 125%. You may need to tweak it depending on the size you prefer your ears to be.

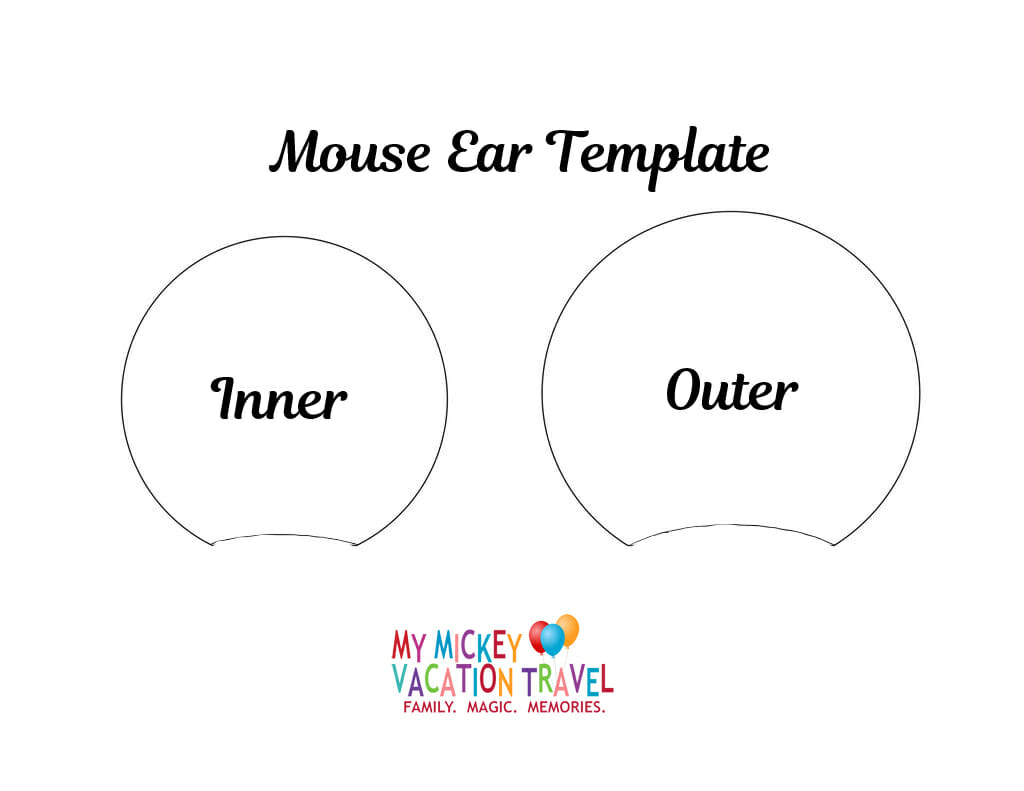
In the beginning, the larger size gave me more margin for error, but now I just find I prefer the size of the finished ear. For the foam, I’m using foam core board cut out with an Xacto knife. You want the outer edge to be smooth if you want your finished ears smooth. I like for the fabric piece to be much bigger than the pattern calls for, so that I have more fabric to wrap around the ear without burning my fingers on hot glue. This is where your fabric selection comes into play too. If you’re using a printed cotton fabric, it’s not going to stretch like an athletic leotard fabric. I have found that a fabric with a little stretch in it gives a much more polished look to the finished ear and will result in much less frustration to assemble. Some people like the look of a flat ear, but I prefer a fluffy ear. The size of your fabric cut will also depend on your fluffiness level. Some people fluff with cotton batting, or cotton balls. I’m using a polyester batting I found on clearance. (In general, you can find a lot of these pieces in clearance bins, since you don’t need a ton of fabric for each pair of ears.)

The ear is comprised of a foam backing, fluff, and finished fabric. Then you’ll adhere a back to a front,  and finish off the outer edge with trim if desired. Line up all four foam pieces and make sure they are roughly the same size, and the edges are smooth, then set them aside. If using battling like I am, it can be cut to the same size as the foam and then set  aside. Then lay out your fabric pattern and cut out 4 ear pieces. Be careful that the pattern is laid on the fabric the way you want the ear to look, which is more important with a directional pattern. When in doubt, remember it is always easier to trim excess than to try to add more! Of course, for this project I’m working with a black fabric, so a white fabric pencil, chalk, or metallic sharpie work well for outlining that stencil!

When you trace the bottom of the pattern piece, tread lightly as sharpie marks can show through on a finished ear. (More reason to go larger with this overall piece!) Now you stack the ears. Place your ear fabric pretty side down, then your fluff, then your ear foam.

Stack and Assemble the Ear Pieces

Now you stack the ears. Place your ear fabric pretty side down, then your fluff, then your ear foam.

With little dabs of glue, and working slowly, start at the top of the ear and gently pull the fabric from the bottom of the stack up an onto the foam.  Then work slowly down one side of the ear, then the next, but leave the bottom curved part open. Be careful to keep even pressure on the fluff when holding it in place so that all the ears finish with the same roundness. Repeat for the other three ears. Tuck the tail up, ensuring all the corners are covered. Trim any excess fabric.

Attach and Finish the Ears with Trim

Pick the two prettiest ear halves, and stack them with the not as pretty ones. Glue the front to the back. Careful not to get glue all the way out the very edge if adding trim. This is the time to be liberal with the hot glue, as the thickness of the fabric around the edges can make it harder for the glue on the foam pieces to adhere.

Pull out your trim, and run it around the edges of the ear, cutting it to size.

Then carefully attach the trim all the way around the seam between the front and back of the ear. I like this mini pom pom trim, and try to tuck it into the seam so the little poms sit right at the outer edge. Remember your front in this part, and when in doubt, make that side pretty!

Position and Secure the Ears on the Headband

Lay out the headband, bow, and two finished ears and decide where you want your ears to land. If you have a pair of ears you like already, use them as a guide. Mark the ear  placement carefully on your headband. I prefer to attach my ears facing down upside down, so that they end up on the front of the headband. So flip the pretty side of each ear to face the table, then attach one, then the other to the band, and let them dry flat on the table. Really press the headband into the curve of the bottom of the ear to ensure a tight fit. Laying  them on the table face down as they fully set and dry ensures they dry level with one another.

Attach the Bow and Finalize Your Creation

Once the ears are on tight and dry, flip them back over, and place your bow. I put a bit of glue under the center of the bow, and tac down the outer edges so it’s always picture ready!

Now only your imagination is stopping you!! You can make more basic ears like these and then dress them up for a favorite character, attraction, festival, or celebration!! Add buttons, ribbon, yarn, paint, glitter, or anything else that will help your creation come to life! What will you create??

Be sure to contact your favorite Authorized Disney Vacation planner, or request your free quote by clicking here.

Tags: crafting, disney ears, disneyland, how to, make mouse ears, mouse ears, walt disney world, WDW
Karen Stoner

Karen is the owner and lead Dream Designer at My Mickey Vacation Travel. She is now in her 10th year of planning vacations to Disney destinations, as well as other vacation experiences. She leads her team of 80 Dream Designers and credits them with the overall success of the agency, and is especially proud of the PLATINUM Authorized Disney Vacation Planner designation that the company has earned.